
Most people finish formal physical therapy about three months after surgery, but recovery doesn't stop there. Strength, mobility, and confidence can keep improving for months afterward, as long as you keep moving. This video walks you through 12 simple exercises to keep your progress going.
Why keep exercising after physical therapy?
Being discharged from physical therapy is a milestone, not the finish line. Many people still have some stiffness, weakness or hesitation on stairs when formal therapy ends, and continued exercise is how those keep improving.
The exercises below build strength in your knees, hips and lower legs, which makes everyday tasks easier: getting up from a chair, getting in and out of bed, using the toilet and climbing stairs. Several also train balance, so you feel steadier and more confident taking longer steps.
The routine also includes two stretches for your back. During recovery, many people walk a little differently to protect the knee, and that compensation can leave the lower and upper back feeling tight.
12 Essential Exercises After
Knee Replacement
These exercises need little more than a chair, a step, a resistance band and a light weight. Every one should be pain-free: some effort or discomfort is fine, but if your knee or any other part of your body hurts, stop and check with your physical therapist or doctor before continuing.
1. Squat
Helps with: knee and hip strength and stability, and getting in and out of chairs or on and off the toilet.
Stand with your feet shoulder-width apart. Start the movement by pushing your hips back, then bend your knees. Keep it shallow at first, using a chair behind you if it helps. As you get comfortable, squat a little lower or hold a weight.
Sets and reps: 3 sets of 15.
2. Bridge
Helps with: core and low back stability, glute and hamstring strength, and getting in and out of bed.
Lie on your back on a mat or carpet with your arms at your sides and your feet slid back toward your buttocks. Flatten your lower back, then press through your heels to lift your hips. Lower slowly and with control rather than dropping down. To progress, straighten your non-surgical leg and do a single-leg bridge on the surgical side.
Sets and reps: 3 sets of 15.
3. Lumbar Flexion Stretch
Helps with: low back tension, which is common in the first few months after knee replacement.
Sit at the edge of a chair with your hands on an exercise ball in front of you. Roll the ball forward, following it with your hands, until you feel a good stretch in your lower back. Hold, then roll it back slowly. Spreading your feet wider gives you more room to lean forward.
Sets and reps: 10 reps, holding 5 seconds each.
4. Windmill Spinal Rotation
Helps with: upper back mobility and back tension caused by walking differently during recovery.
Place your hands on a countertop or the back of a sturdy chair with your spine straight, not arched. Open one arm up toward the ceiling, rotating through your upper back, pause, then bring it back down. You should feel a gentle stretch through your upper and lower back. Alternate sides.
Sets and reps: 15 reps with a 2-second pause at the top.
5. Elephant Walk
Helps with: straightening the knee and stretching the hamstrings.
Place your hands on a table, low chair or stool in front of you with a slight bend in both knees. Straighten one knee, then the other, alternating back and forth. You should feel a strong stretch along the back of your legs. To progress, use a lower surface, such as a yoga block.
Sets and reps: 2 sets of 15.
6. Step-ups and Step-downs
Helps with: climbing stairs, plus knee and hip strength.
Step-up: Place your surgical foot on a step and press through your heel to step up, then bring the other foot up. Step back down leading with your non-surgical leg.
Step-down: Do the reverse, stepping down with your non-surgical leg and back up with your surgical leg.
For both, keep your back straight and avoid swinging your trunk. Use a railing if you need it.
Sets and reps: 10 step-ups, then 10 step-downs.
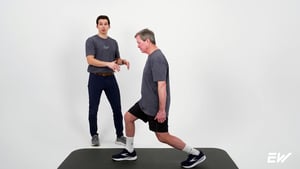
7. Split Squat
Helps with: single-leg strength, stability and balance, so you feel more confident walking and taking longer steps.
Take a big step forward with your surgical leg. Keeping your back straight, lower your back knee toward the floor only as far as feels comfortable, then come back up. Hold onto a chair or stool at first and keep the depth shallow. As you progress, lower your knee further or hold a 5 to 20 lb dumbbell, kettlebell or weighted ball.
Sets and reps: 3 sets of 15.
8. Backwards Walking
Helps with: ankle, knee and hip mobility, and balance while moving.
In a hallway, along a wall or on a sidewalk, walk backwards. Start with very small steps, looking down at your feet if it helps you feel steady. As you gain confidence, take longer steps and keep your head up.
Sets and reps: 3 sets of 20 steps.
9. Suitcase Carry
Helps with: core, back, hip and knee stability while walking, plus balance.
Hold a weight in one hand and walk back and forth in a hallway or outside. You'll probably feel pulled toward the side of the weight; use your muscles to stay tall and level instead of leaning. Use a heavier weight as you get stronger.
Sets and reps: 3 sets of 20 steps.
10. Banded Side Step
Helps with: knee and hip stability, hip strength, and balance.
Place a resistance band around your legs just above your knees. Get into a slight squat with your toes pointing forward and tension on the band. Step sideways, keeping the band taut and your toes from turning out. To make it harder, move the band down toward your ankles.
Sets and reps: 10 steps to the right, then 10 steps to the left.
11. Heel Raises and Toe Raises
Helps with: lower-leg strength, which gives your knee more support.
Hold the back of a chair or a wall. For heel raises, rise up onto your toes as high as you can, thinking "tall" rather than leaning forward, then lower. For toe raises, lift your toes off the floor while keeping your heels down. Hold on firmly, since toe raises can feel a bit unsteady at first.
Sets and reps: 3 sets of 20 heel raises, then 3 sets of 30 toe raises.
12. Wall Sit
Helps with: knee strength and stability in a squatting position, which makes chairs and toilets easier.
Lean your back against a sturdy wall and step your feet out about one shoe length, feet even. Slide down the wall, stopping before your knees bend past 90 degrees, and hold. Keep your back flat against the wall. Wearing a shirt that slides easily helps.
Hold: 20 seconds at first, building up to 30 seconds.
Quick Reference: Your At-Home Routine
Ask your physical therapist how often to do this routine. If the full list feels like too much at once, you can split it across two days.
|
Exercise |
Sets and Reps |
Equipment |
|---|---|---|
|
1. Squat |
3 x 15 |
Chair (optional), weight to progress |
|
2. Bridge |
3 x 15 |
Mat or carpet |
|
3. Lumbar flexion stretch |
10 reps, 5-second hold |
Chair, exercise ball |
|
4. Windmill spinal rotation |
15 reps, 2-second hold |
Countertop or chair |
|
5. Elephant walk |
2 x 15 |
Table, low chair or yoga block |
|
6. Step-ups and step-downs |
10 up, 10 down |
Step or stairs |
|
7. Split squat |
3 x 15 |
Chair for support, 5 to 20 lb weight to progress |
|
8. Backwards walking |
3 x 20 steps |
Hallway or sidewalk |
|
9. Suitcase carry |
3 x 20 steps |
Dumbbell or other weight |
|
10. Banded side step |
10 steps each way |
Resistance loop band |
|
11. Heel and toe raises |
3 x 20 heel, 3 x 30 toe |
Chair or wall |
|
12. Wall sit |
Hold 20 to 30 seconds |
Wall |
Safety Tips
Every exercise in this routine should be pain-free. Feeling some effort or discomfort is normal, but if your knee or any other part of your body hurts, stop and talk with your physical therapist or doctor before continuing.
- Check with your care team first. These exercises are designed for after you've been discharged from physical therapy. Make sure your surgeon or therapist agrees you're ready.
- Start easy. Use shallow depths, small steps and light weights at first, and hold onto a chair, counter or wall whenever you need support.
- Progress gradually. Go a little lower, add a little weight or take slightly bigger steps only once an exercise feels comfortable.
- Focus on form. Keep your back straight, your toes pointing forward, and your movements slow and controlled.
Contact your doctor if you notice new or worsening knee pain, swelling, warmth or redness, or if your knee feels unstable. This article is for general education and isn't a substitute for advice from your own medical team.
Frequently Asked Questions
What exercises should I do after physical therapy for a knee replacement?
A good at-home routine combines strength exercises (squats, bridges, step-ups, split squats, wall sits and heel raises), mobility work (like the elephant walk), and balance training (backwards walking, suitcase carries and banded side steps).
Does recovery stop when physical therapy ends?
No. Formal physical therapy often ends around three months after surgery, but strength and mobility can keep improving well beyond that with regular exercise.
Is it normal to still feel stiff after finishing physical therapy?
Some stiffness is common for months after a knee replacement. Exercises that stretch the knee and keep it moving, such as the elephant walk and step-ups, can help. If stiffness is getting worse rather than better, check with your doctor.
What equipment do I need?
Very little: a sturdy chair, a step or stairs, a wall, a resistance loop band, a light dumbbell or other weight, and an exercise ball for the back stretch.
Why are there back exercises in a knee routine?
While recovering, many people walk differently to protect their knee. That can cause tension in the lower and upper back, which the lumbar flexion stretch and windmill rotation help relieve.
What should I do if an exercise hurts?
Stop. These exercises should never cause pain. Try an easier version, such as a shallower squat or holding on for support, and talk with your physical therapist or doctor if pain continues.